Welcome Pinterest Users!
I've had a LOT of requests about how I make my
layette gowns.
These are fairly easy to make (I can make one in about 45 minutes) and they really wow at baby showers and has become one of my standard baby shower gift for girl babies. If you'd like to use my tutorial, please be polite and leave me a comment. You may use this for both personal or commercial (small business only please), but please don't claim this tutorial as your own.
If something is unclear or confusing, please let me know. What is clear to me, might not be obvious to you, but I've tried to make sense in the tutorial!
Please note that this tutorial is for personal use only. If you would like to purchase a license to make these for profit, please contact me at info@bananbearboutique.com for additional information.
First, let's gather supplies. Aside from basic sewing supplies, you will need the following:
Infant Bodysuit (newborn, 0-3m, 3-6m)
1/2 yard of fabric (36"x18")
approximately 1 yard of 1.5" wide ribbon
approximately 1.5" of 7/8" or 5/8" ribbon (for bow center)
18" of .5" elastic OR approximate 1 yard of ribbon (I prefer either 3/8 or 5/8)
interfacing (for button holes and to support the bow)
After gathering supplies, lay your onesie out flat on your cutting mat. Be sure that you have any folds or wrinkles out of it so you will get a nice, clean cut. I usually use the sleeves as a guide for cutting and line the onesie up below the sleeves with the lines on my mat. (Sometimes, however, the onesies are uneven, so make sure to measure carefully or your gown will look a little wonky!)
Next, using the bottom of the sleeve as your guide, place your ruler 1.5" to 2" below that mark and cut the onesie. If I'm using a newborn onesie, I'll typically make the cut at 1.5", but if I have a larger monogram or a larger onesie, I'll make it at 2".
If you are planning to monogram the gown r add any other type of embellishment, this is the best time to do it. It's much easier to embroider it before the fabric from the bulky gown is in your way.
Now that the monogramming is done, put this part aside for a few minutes while you work on the construction of the gown. You'll come back to this piece in a bit.
When I make these, I take 1 yard of fabric and cut it in half on the fold of the fabric. You'll need one 18"x36" piece for one gown and you can put aside the other half for another gown or another project. This length is a little more than 3 times the width of the onesie and a length of 1 yard will make nice, full gathers. (If you prefer smaller gathers for a slimmer gown, try using a 24" length of fabric, which should be a little more than 2 times the width of the onesie.) Fold your fabric so it is 18"x18" (or 18"x12") and sew a seam along the long edge. If you have a serger, then serge it together. If not, just sew a straight stitch and then zig zag the edges or do a French seam. I also sew in my materials label into the seam now. You should have a "tube" of fabric with both ends open.
After serging down the side seam, I serge the bottom where the hem will be. If you don't have a serger, just skip this part.
Now you are going to gather the top of the fabric (the raw, unserged side of the fabric tube). There are many different techniques for doing this, so use whichever method you are most comfortable with. Sometimes I use my gathering foot, but most of the time I just use my regular foot because I don't feel like changing it. You could also use a ruffler, but I prefer the look of gathers over pleats for this project.
I use the traditional way of gathering most of the time. I start by making a long stitch on the edge of the fabric. (I move my needle as far right as it will go (as seen in the photo), but you can keep the needle in the "home" position if that's what you are used to doing.) After you stitch that, pull the bobbin thread to gather.
A helpful hint is to make 2 long rows of stitching for gathering fabric: one closer to the edge and another one to the left of it. Doing this gives you a little more control over the spacing of the gathers and I think the final product looks a little nicer too. This is also particularly helpful if one of the gathering thread breaks!
Here are my gathers. You'll want to gather the fabric evenly so it's about the same width at the onesie opening.
When I'm constructing the gown, it's easiest for me to keep the bottom part inside out (as shown below) and keep the bodice right side out. What you'll want to do here is slip the bodice into the gown. I like to keep my seam in the back, but you can place it on the side if you prefer.
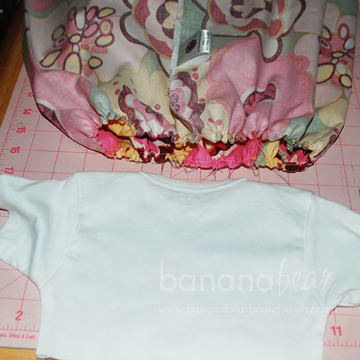
After slipping the bodice into the gown, it should look something like this. You will want to even up the edges of the gown and the onesie. (I let it overlap to better illustrate it to you.)
Now we are going to pin the onesie top to the gathered skirt. Make sure the bottom of the onesie and the top of the skirt are even at the edges. I usually pin about every inch or so along the edges. You'll thank yourself for using more pins when you start sewing it and your gathers will be more even and stitching will be easier.
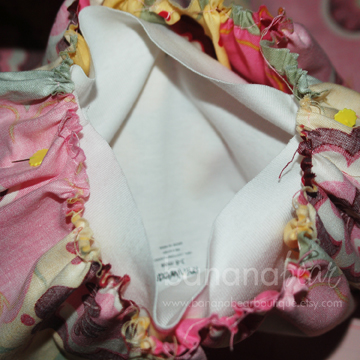
After you have it pinned you are ready to sew! (I only have a few pins in mine, but I suggest you using more!)
With the gown pinned, you will sew a straight stitch around the two pieces to connect them. I do a slightly longer stitch to the onesie will still have a little bit of stretch to it and it will still be easy to manipulate.
(You can't tell in this photo, but my stitch is just to the left of the pink gathered stitch you see here, which is why I stitch the gathering stitch closer to the edge.)
After you sew the two pieces together, make sure none of the gathers have slipped and that they are fairly even. It's still really easy to make adjustments to it at this point. You can pull out the gathering thread at this point if desired. Then to clean it up and keep it looking nice, we're going to serge or zig zag stitch over the edges.
When overlocking, use the settings for knits, so it will still have some stretch to it.
Turn the dress right side out. You could just sew a hem at the bottom and have a dress now if you wanted. But let's do some embellishing instead to make it really pretty!
Now we need the 1.5" ribbon. BEFORE you cut your ribbon, measure the width of your onesie. My onesie is about 16" around, so I cut my ribbon strip to about 17.5".
To stitch on the ribbon, I move my needle to the farthest position to the right and use the foot as a guide. I even up the right edge of the ribbon with the right edge of the foot's needle hole opening (see the next two photos below).
Continue to stitch around the edge of the ribbon. When you get about a half inch or so away from the end of the ribbon, fold the end over to hide the raw edge and stitch it downacross the top and along the edge of the end.
With the remainder of your ribbon, form a bow. I like the bow to have long tails, so I use a longer piece, but you can definitely get away with using less ribbon if you want a no tails tow or a short tails bow.
After forming the bow, add a center piece to it by wrapping around that small piece of 7/8" ribbon to it. To make the next step easier, I just put a few stitches in it now...just enough to baste it together.
Hint: You'll want to keep the center of the bow flat and make sure it's not bulky like you might make a hair bow. This is really important so we can sew the bow to the gown!
Now that the bow is formed and the center is basted, it's time to add the bow to the gown. First, decide where you want it. I like the bow slightly off to the left (right when it's worn), but you might choose to make the bow in the center of the gown. Mark the gown where you want the bow to be sewn (or just wing it like me!) and add a little bit of interfacing to the back side of the gown where you will be sewing the bow. Now take the bow and carefully sew it on to the gown. I do a straight stitch first to baste it on and then I use a tighter zig zag to really make sure it's secure. Because of the small size of the onesie and the bujlk of the gown, it can be a little tricky to manipulate so be careful and go slow!
After stitching the bow on, it should look like this. Just trim the threads and heat seal or use Fray Check on the ends of the ribbon to keep it from fraying and you're done with that part!
Now we are ready to hem the bottom. If you serged the bottom already, you can just create a 1" casing by pressing the hem up. If you don't have a serger, press the hem up .25" and then fold it under and press a 1" casing. If you are adding a ribbon tie for the bottom, BEFORE you move on to the next step add two button holes on the inside of the casing. (I make .25" button holes most of the time. As long as your ribbon will fit through the hole, you can make it larger or smaller.) I usually add it in the back near the seam, but it really doesn't matter where you put it.
If you are using a ribbon tie, go ahead and sew the casing closed. You'll want to insert your ribbon through one of the ribbon holes through the casing and then out of the other hole.
If you are using an elastic cinch, sew the casing closed leaving about an inch open so you can insert you elastic. String your elastic through the casing and stitch your elastic together. Sew your casing shut and you're finished!
Tie your ribbon into a bow and you're done!
This photo shows a gown with the elastic cinch.
Here are a few photos of some finished gowns that I've made. Any questions? Just ask!
EDITED 10/1: The PDF version of this tutorial is available for download on my applique website here. You must add it to your cart and checkout, but there is no cost for it. Thanks so much and enjoy!
Pin It