
Welcome Pinterest Users!
I've had a LOT of requests about how I make my layette gowns.
These are fairly easy to make (I can make one in about 45 minutes) and they really wow at baby showers and has become one of my standard baby shower gift for girl babies. If you'd like to use my tutorial, please be polite and leave me a comment. You may use this for both personal or commercial (small business only please), but please don't claim this tutorial as your own.

If something is unclear or confusing, please let me know. What is clear to me, might not be obvious to you, but I've tried to make sense in the tutorial!
Please note that this tutorial is for personal use only. If you would like to purchase a license to make these for profit, please contact me at info@bananbearboutique.com for additional information.
First, let's gather supplies. Aside from basic sewing supplies, you will need the following:
Infant Bodysuit (newborn, 0-3m, 3-6m)
1/2 yard of fabric (36"x18")
approximately 1 yard of 1.5" wide ribbon
approximately 1.5" of 7/8" or 5/8" ribbon (for bow center)
18" of .5" elastic OR approximate 1 yard of ribbon (I prefer either 3/8 or 5/8)
interfacing (for button holes and to support the bow)
After gathering supplies, lay your onesie out flat on your cutting mat. Be sure that you have any folds or wrinkles out of it so you will get a nice, clean cut. I usually use the sleeves as a guide for cutting and line the onesie up below the sleeves with the lines on my mat. (Sometimes, however, the onesies are uneven, so make sure to measure carefully or your gown will look a little wonky!)

Next, using the bottom of the sleeve as your guide, place your ruler 1.5" to 2" below that mark and cut the onesie. If I'm using a newborn onesie, I'll typically make the cut at 1.5", but if I have a larger monogram or a larger onesie, I'll make it at 2".

If you are planning to monogram the gown r add any other type of embellishment, this is the best time to do it. It's much easier to embroider it before the fabric from the bulky gown is in your way.

Now that the monogramming is done, put this part aside for a few minutes while you work on the construction of the gown. You'll come back to this piece in a bit.

When I make these, I take 1 yard of fabric and cut it in half on the fold of the fabric. You'll need one 18"x36" piece for one gown and you can put aside the other half for another gown or another project. This length is a little more than 3 times the width of the onesie and a length of 1 yard will make nice, full gathers. (If you prefer smaller gathers for a slimmer gown, try using a 24" length of fabric, which should be a little more than 2 times the width of the onesie.) Fold your fabric so it is 18"x18" (or 18"x12") and sew a seam along the long edge. If you have a serger, then serge it together. If not, just sew a straight stitch and then zig zag the edges or do a French seam. I also sew in my materials label into the seam now. You should have a "tube" of fabric with both ends open.

After serging down the side seam, I serge the bottom where the hem will be. If you don't have a serger, just skip this part.

Now you are going to gather the top of the fabric (the raw, unserged side of the fabric tube). There are many different techniques for doing this, so use whichever method you are most comfortable with. Sometimes I use my gathering foot, but most of the time I just use my regular foot because I don't feel like changing it. You could also use a ruffler, but I prefer the look of gathers over pleats for this project.
I use the traditional way of gathering most of the time. I start by making a long stitch on the edge of the fabric. (I move my needle as far right as it will go (as seen in the photo), but you can keep the needle in the "home" position if that's what you are used to doing.) After you stitch that, pull the bobbin thread to gather.
A helpful hint is to make 2 long rows of stitching for gathering fabric: one closer to the edge and another one to the left of it. Doing this gives you a little more control over the spacing of the gathers and I think the final product looks a little nicer too. This is also particularly helpful if one of the gathering thread breaks!

Here are my gathers. You'll want to gather the fabric evenly so it's about the same width at the onesie opening.


When I'm constructing the gown, it's easiest for me to keep the bottom part inside out (as shown below) and keep the bodice right side out. What you'll want to do here is slip the bodice into the gown. I like to keep my seam in the back, but you can place it on the side if you prefer.
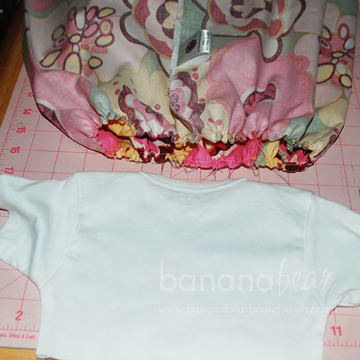
After slipping the bodice into the gown, it should look something like this. You will want to even up the edges of the gown and the onesie. (I let it overlap to better illustrate it to you.)

Now we are going to pin the onesie top to the gathered skirt. Make sure the bottom of the onesie and the top of the skirt are even at the edges. I usually pin about every inch or so along the edges. You'll thank yourself for using more pins when you start sewing it and your gathers will be more even and stitching will be easier.
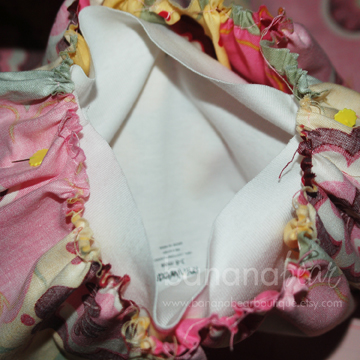
After you have it pinned you are ready to sew! (I only have a few pins in mine, but I suggest you using more!)

With the gown pinned, you will sew a straight stitch around the two pieces to connect them. I do a slightly longer stitch to the onesie will still have a little bit of stretch to it and it will still be easy to manipulate.
(You can't tell in this photo, but my stitch is just to the left of the pink gathered stitch you see here, which is why I stitch the gathering stitch closer to the edge.)


After you sew the two pieces together, make sure none of the gathers have slipped and that they are fairly even. It's still really easy to make adjustments to it at this point. You can pull out the gathering thread at this point if desired. Then to clean it up and keep it looking nice, we're going to serge or zig zag stitch over the edges.
When overlocking, use the settings for knits, so it will still have some stretch to it.


Turn the dress right side out. You could just sew a hem at the bottom and have a dress now if you wanted. But let's do some embellishing instead to make it really pretty!
Now we need the 1.5" ribbon. BEFORE you cut your ribbon, measure the width of your onesie. My onesie is about 16" around, so I cut my ribbon strip to about 17.5".
To stitch on the ribbon, I move my needle to the farthest position to the right and use the foot as a guide. I even up the right edge of the ribbon with the right edge of the foot's needle hole opening (see the next two photos below).

Continue to stitch around the edge of the ribbon. When you get about a half inch or so away from the end of the ribbon, fold the end over to hide the raw edge and stitch it downacross the top and along the edge of the end.


With the remainder of your ribbon, form a bow. I like the bow to have long tails, so I use a longer piece, but you can definitely get away with using less ribbon if you want a no tails tow or a short tails bow.
After forming the bow, add a center piece to it by wrapping around that small piece of 7/8" ribbon to it. To make the next step easier, I just put a few stitches in it now...just enough to baste it together.
Hint: You'll want to keep the center of the bow flat and make sure it's not bulky like you might make a hair bow. This is really important so we can sew the bow to the gown!


Now that the bow is formed and the center is basted, it's time to add the bow to the gown. First, decide where you want it. I like the bow slightly off to the left (right when it's worn), but you might choose to make the bow in the center of the gown. Mark the gown where you want the bow to be sewn (or just wing it like me!) and add a little bit of interfacing to the back side of the gown where you will be sewing the bow. Now take the bow and carefully sew it on to the gown. I do a straight stitch first to baste it on and then I use a tighter zig zag to really make sure it's secure. Because of the small size of the onesie and the bujlk of the gown, it can be a little tricky to manipulate so be careful and go slow!


After stitching the bow on, it should look like this. Just trim the threads and heat seal or use Fray Check on the ends of the ribbon to keep it from fraying and you're done with that part!


Now we are ready to hem the bottom. If you serged the bottom already, you can just create a 1" casing by pressing the hem up. If you don't have a serger, press the hem up .25" and then fold it under and press a 1" casing. If you are adding a ribbon tie for the bottom, BEFORE you move on to the next step add two button holes on the inside of the casing. (I make .25" button holes most of the time. As long as your ribbon will fit through the hole, you can make it larger or smaller.) I usually add it in the back near the seam, but it really doesn't matter where you put it.


If you are using a ribbon tie, go ahead and sew the casing closed. You'll want to insert your ribbon through one of the ribbon holes through the casing and then out of the other hole.
If you are using an elastic cinch, sew the casing closed leaving about an inch open so you can insert you elastic. String your elastic through the casing and stitch your elastic together. Sew your casing shut and you're finished!


Tie your ribbon into a bow and you're done!


This photo shows a gown with the elastic cinch.

Here are a few photos of some finished gowns that I've made. Any questions? Just ask!
EDITED 10/1: The PDF version of this tutorial is available for download on my applique website here. You must add it to your cart and checkout, but there is no cost for it. Thanks so much and enjoy!


Your gowns are absolutely gorgeous! I'm not clear on where you place the ribbon as you stitch it on. Is it just barely above the waist seam on the onsie?? And do you only stitch the top edge of the ribbon? Thanks for sharing your technique!
ReplyDelete~Karoline
so cute
DeleteThese are absolutely among the most adorable things I've ever laid eyes on! I haven't tried to make one yet, but I now have the tutorial in-hand and plan to start on one this week. My baby girl is due in June, and infant gowns are my absolute favorite things ever! Thank you for your kindness in posting this - your instructions seem so easy to follow. If and when I'm a success (and that's a big, fat "if" - ha!), I'll add some photos. :) Thanks, again!
ReplyDeleteKaroline-I just saw your comment so sorry for not answering sooner! For the ribbon, I stitch it just above the part where the onesie and the fabric come together. Basically it is top stitching the bodice to the dress portion and securing the ribbon at the same time. I do only stitch the top part, but you could do the bottom as well. I hope that makes sense!
ReplyDeleteJaime - I'm sure it'll be a huge success! I can't wait to see what you come up with!
ReplyDeleteI have a baby girl coming in 3 weeks or less and I'm impatiently waiting my 2 year old's nap time to get started! I tried to make one on my own without a tutorial and unless she's 16 inches and 3 pounds, it's going to be snug! I'm so excited to find an actual tutorial. Hopefully 2nd time's a charm!
ReplyDeleteOh my word, these are GORGEOUS! I can't wait to try my hand at making some...I'm sure they won't turn out as fabulous as yours, but surely practice makes perfect...
ReplyDeleteWould it work the same if I used elastic in the bottom casing instead of ribbon?
ReplyDeleteJust thinking it would be easier to wash and wouldn't have to worry about the long ribbon pieces getting tangled or fraying in the wash.
Essentially it would be the same with the elastic casing. I usually cut the elastic to 15.5" long. The opening will be wide enough for easy changing, but not too open. I hope that helps!
ReplyDeleteWhere did you learn to tie such pretty bows? Also, does your ribbon meet in the back where the other seam is?
ReplyDeleteI would love to try my hand at one. I saw one on a baby recently and it was super cute. I wondered how it was put together. Thank you for putting this tutorial together!
ReplyDeleteToday i made one! Tomorrow you can watch it on my blog (ginehirche.blogspot.com) . Your tutorial is really easy to understand! Everything worked perfect - only the ribbon - I don't like how it looks like, it is rippled. Can you give me a tip how to perfectly stitch the ribbon?!
ReplyDeleteThanks!
G!ne - I'm so glad you found the tutorial useful and I'm looking forward to seeing it on your blog.
ReplyDeleteAs far as the ribbon goes, a little rippling is to be expected since you are basically stitching on the gathered part of the gown. I think a few things might play into how much it ripples though. One factor is the ribbon type. I usually use a nice quality grosgrain ribbon and have very little problems with that. The one time I used satin ribbon, I hated the way it looked; it was very rippled and just ugly to me.
Another factor could be the stitch length. I usually have my stitches set to 3-3.5. If it's a tighter stitch, it might cause it to bunch a little too.
I am a pretty fast sewer, but I really take my time sewing the ribbon around the waist. When I sew the ribbon around, I do it slowly and I try to hold the gown taught around the stitching. Also when you are finished stitching it, you can kind of move the ribbon around to adjust where the rippling is seen (move it toward the back). I hope that paragraph makes some sense! I'm not good with the technical terms. :)
I have 5 grandchildren and #6 due this December. A baby girl. So, I want to surprise my daughter and make some of these for her and have a couple at my house as well. They are adorable! Thanks for sharing and allowing us to borrow your pattern so we can enjoy making some too!
ReplyDeleteThanks:)
Gr'Nana~girl in Weatherford, TX 2011
Love the tutorial...I can't wait to try to make one for a friend. Thanks for sharing!
ReplyDeleteHave you ever left the onesie uncut? Just wondering if it would work just as well.
ReplyDeleteI haven't ever left it uncut, but I don't see why that would be a problem!
ReplyDeleteprecious!!! can't wait to try this! thank u so much!
ReplyDeleteJust made this as a shower gift and it turned out adorable. I used flannelette instead and did not cut the bottom of the onsie off, just attached skirt and it worked out great. Thank you so much for your tutorial-I could not have accomplished this without it.
ReplyDeleteLoved your tutorial. I found it to be easy to follow. Im VERY excited to give this adorable layette gown a go tomorrow.
ReplyDeleteThank you for taking time to share this with us. Good job!
Does using a straight stitch to attach the ribbon take away from the stretch factor? I have made 5 of these now, experimenting with how I attached the skirt on a couple of them. I have not done the ribbon embellishment on one yet because I am afraid that will take away from the stretch. I made up an altered onesie a while back and the receipient couldn't get over the baby's head. THANK YOU so much for sharing the tute! I love it!
ReplyDeleteThis is a great idea and your tutorial is wonderful. I hope to try this soon. Thanks for taking the time to post this. Great Work!
ReplyDeleteCould an infant t shirt be used rather than a onesie?
ReplyDeleteYes, Absolutely!
DeleteI am making some gowns for my grand daughter. I love your pattern. It is very easy to follow. Thank you for sharing. I am worried that the newborn-3 month size will be tight to get over head once gown and ribbon are sewn on. Have you had a problem with this?
ReplyDeleteI've made several newborn size ones with no complaints. That said, I do take the onesie and stretch it out a little before I add the cotton fabric to it. If you are really concerned though, I would leave off the ribbon because sewing that on is what really restricts the stretch in the onesie. I hope that makes sense!
DeleteAbout how much do you stretch the onesie before sewing the skirt on? 1/4th? 1/3rd? 1/2? I'm getting ready to sew my first one today, and want to make sure it will fir over the baby's head!
Deletethank you so much for this tutorial. I wish that I had found this when my granddaughters were infants. They are now 2 and 3 so I guess i will have to make these to give as gifts.
ReplyDeleteSuch a precious idea. Love a gown for those late night changings.
ReplyDeleteMy 9th grandbaby ,Liberty, is due in July and my daughter has asked for onesie gowns for when they have visitors or are out and about! something to make diaper changing easier and also be stylish! your tutorial is amazing and i love your gowns! thank you for sharing!!!
ReplyDeleteI have only been sewing for a year and a half so these will be my 1st gowns,so exciting,i have all sizes/colors of onesies gathered and more fabric choices than she will possibly ever need...
You're welcome, Beth! Congratulations on the upcoming birth of Liberty. Little girls are so much fun and I'm sure that grandbaby will be spoiled!
DeleteJust looked at your tutorial ... on how to sew this gorgeous onsie gown ... sooo, exciting ... I'm expecting our first grandbaby in April, and I can't wait! It's a little girl, and I will be on the prowl for both items (a onsie) and (feminine material) ... VERY SOON! So, I can have it ready for traveling 6 hours to her birth! YEAH! thank you for such a GREAT tutorial!
DeleteDo you need to buy a size larger onesie since it will not be able to stretch anymore with the cotton fabric sewn on?
ReplyDeleteThis is really cute. I might get one made for my daughter who is expecting her first baby this summer.
ReplyDeleteThis is just too cute for words! Thank-you for sharing the pattern. Now I just cna't wait for some one to have a baby girl.
ReplyDeleteI will find out if my prego baby is a boy or girl soon. If female I will definitely be using your tutorial to make some gowns. Thank you for posting this and for the wonderful pictures.
ReplyDeleteI am excited to give this a try. I have a boy and well they are just not cute things to make for them, lol. So once I get my hands on a girly onsies I will shopping for some matching material!! Thanks for this SUPER CUTE idea :)
ReplyDeleteOur first grand baby is due in 4 weeks and I can't wait to make a few of these. They are adorable!
ReplyDeleteLove the tutorial! Planning on using it soon for a preggo friend. I have a question about the embroidery. What kind of stabilizer do you use when working with onesies? I have the hardest time figuring that out so that it doesn't end up puckering too much. Thanks so much for your help!
ReplyDeleteHi Kelly! Here's the way I stabilize the onesies. This isn't the only way to do it, but it works for me and I think I get pretty good results! When I was using a single needle, I would hoop one piece of tearaway (for my multi-needle, I use two pieces of tearaway) and one piece of poly mesh(not the fusible kind...I don't prefer it). I always used the 'hoopless' method for embroidering, so I never hoop the onesie. I spray 505 spray onto the stabilizer and adhere the onesie to it, then embroider! I think the 505 spray makes a huge difference then just pinning. It keeps the knit taught enough so there is no puckering. I hope that makes sense!
DeleteI just made the gown and it is so cute...would love to send you a pic. Thanaks so much for sharing the tutorial with us. I have a question. I would love to make my 2 1/2 year old granddaughter a dress using a tiny strap t shirt....would I just double the amount of fabric needed to go around the bottom of the shirt and make it the length I need it. Any suggestions would be helpful.
ReplyDeleteLove this. My daughter aske me to make some for my granddaughter due in August. Everyone that has seen them LOVES them! I'd live to share pics...but not tech savy enough for that. Lol
ReplyDeleteThis is beautiful. My sister is due in 6 weeks. I will try this tutorial. You did a beautiful job!
ReplyDeleteGreat tutorial, thanks so much! This are great baby gifts!
ReplyDeleteYou're welcome!
DeleteI think I'm going to try it. I've never made baby clothes before, thank you for the great instructions!
DeleteHave you ever done these in a onesie bigger than newborn? My friend just had a 9lb baby girl so I dont think the newborn would work :) Your gowns are adorable thanks so much for sharing.
ReplyDeleteAbsolutely! I usually only get requests for these in newborn to 3-6 months, but I've also made one in a 12 month size or as a dress for a toddler (no cinch at the bottom).
DeleteThank you very much for sharing ! I plan on making one for my dear friend's first baby, and a toddler dress for my daughter. :-)
ReplyDeleteThank you !
NP
Love this! I have a baby shower in 3 days and need a gift. I'm going to give this a try. Thanks
ReplyDeleteMy daughter is due with twin girls.. I can't wait to make these for their coming home from the hospital outfits. Thank you for the great tutorial.
ReplyDeleteThese are absolutely adorable!! I can't wait to try it!
ReplyDeleteThese sew up so quickly and look great!
ReplyDeleteThanks-trying this today!
ReplyDeleteThank you so much for sharing your tutorial! I want so bad to learn to sew, and I guess this will be my first attempt! :)
ReplyDeleteI also would like to make these at home and sell them to the other military spouses in my community and prb on Etsy. Would I have to purchase anything from you saying that it's okay for me to do that? Also, how would you adapt this to make the same layette without the boy for boys?
ReplyDeleteI tried contacting you at the address provided but it bounced back.
Hello! The tutorial is free for personal and (small business) commercial use. I just ask that you reference Banana Bear as the source of the tutorial in your listing. :) For a boy, I would keep the length the same, but make the width a lot slimmer...maybe 18-20 inches around to make it not so gathered.
Deletethis looks amazing! my sister is having daughter #2 next month & said she really loves the "sack-type" gowns. i'm so thankful that i found this tutorial so now i can make her some custom gowns! thank you
ReplyDeleteGreat tutorial! Thanks for sharing!
ReplyDeleteDO you have or could you tel me how I would make one of these grown and leave the onesie in tack(not cutting it off)? LOVE this and can't wait to try making one.
ReplyDeleteThanks
Gwenna
gdoty@uthsc.edu
This was a great sewing project. I am a novice (that may even be a stretch) when it comes to sewing and I didn't have any problems following or completing this project.
ReplyDeleteThank you
I cant wait to learn how to sew to make this!!!
ReplyDeleteI cant wait to learn how to sew to make this!!!
ReplyDelete
ReplyDeleteI really appreciate for your work. Please update this regulaly.
Ur work is soooo beautiful!! Thank you for sharing how you create your dresses. I am definately going to attempt this one! Thanks agian!
ReplyDeleteThis is AWESOME! Thank you so much! Can't wait to make one!
ReplyDeleteHow clever and generous you are with this tutorial. Thank you! I have just opened my home based embroidery business and I can see this will be an item I will make for gifts! It is precious. Thank you again.
ReplyDeleteFrances in North Florida
Good luck with your new business Frances! These are a great seller. :)
DeleteJust made one for my new great niece ! love it! Thank you for sharing.
ReplyDeleteThis is too cute....will have to try to make one. Thank you!
ReplyDeleteThanks so much for sharing. Once I get the nerve up, I will try it...LOL
ReplyDeleteSo cute and super simple! Thanks for the tutorial!!
ReplyDeleteAubrey
Super cute!!!
ReplyDeleteI would imagine you could easily repurpose a pillowcase for the bottom half of this too.
Love your tutorial ! Made this gown today! It turned out great! Thanks for sharing! ~ Paula aka LuLu Made It
ReplyDeleteThis is a GREAT tutorial and very easy to follow. Awesome job! Thank you for sharing your talents. I will be trying this for a baby gift very soon:)
ReplyDeleteGreat tutorial. Very easy to follow and these gowns are just beautiful! I will be attempting some soon.
ReplyDeleteGreat job! I made one and its so cute! My serger has differential feed so I used that to gather. Worked like a charm!
ReplyDeleteGreat job! I made one and its so cute! My serger has differential feed so I used that to gather. Worked like a charm!
ReplyDeleteThanks so much for sharing. Hope to make one soon.
ReplyDeleteThis comment has been removed by the author.
ReplyDeleteThis comment has been removed by the author.
ReplyDeleteI am expecting and wanted to make some gowns for my new little one. Thank you so much for the tutorial and the step by step pictures! I love it!
ReplyDeletevery pretty, now I want to make one
ReplyDeleteDo you have any suggestions for making the bow?
ReplyDeleteI just take a long piece of ribbon and fold two loops into it and then gather. I don't really have any special technique, but it usually turns out nice. :)
DeleteI am having a problem with the gathering. I dont think my machine makes really long stitches. The longest it will go is stipl really short. The thread breaks when i try to pull for the gathring. Hand sew??? Should I hand sew robbon as well?
ReplyDeleteIf I chose to use elastic on the bottom of the gown, instead of ribbon, how much elastic do I need to use? Also, would 1/2 inch width work? Your gowns are beautiful and I look forward to making them. Thank you so much for sharing!
ReplyDeleteI use about 16" of elastic at the bottom, which is what I saw on a lot of premade baby gowns. I usually use 3/8" elastic, but 1/2" should be just fine. :)
DeleteThank you!! so sweet of you to share :)
ReplyDeleteThank you for sharing! so sweet :)
ReplyDeleteOMG I wish I saw this two days ago before trying to figure it out myself! Your tutorial makes much more sense than my way of doing it and looks so much better! Thanks for sharing your awesome tutorial!
ReplyDeleteThis Is so adorable! I am going to attempt this even though I'm a beginner sewer. Thank you
ReplyDeleteGood luck making it! They are pretty easy to make, so I'm sure you'll have no problems at all!
DeleteI would soooo love to see some made for boys! ; ) Particularly superheroes! Like a white onesie with black bottom for Batman, embellishments being yellow belt and batman emblem on chest instead of name! Or white onesie with red bottom for Flash, embellishments being yellow belt and flash emblem on chest! Thanks so much for the ideas!!
ReplyDeleteWhat is the plastic piece called that you are using the measure for the 1 inch hem?
ReplyDeleteHi Kim! I bought it from Joann several years ago for a couple of dollars. It's called Dritz Ezy-Hem and it's actually made of metal, which is really nice because you can iron it with no problem. I believe the Scientific Seamstress had a free easy hem guide that you could print off too.
DeleteI love this tutorial!! I just whipped 2 out for baby shower gifts for 2 sisters I know who are due within a month of each other! I can't believe I have been buying blank ones ad only embroidering them. I will definitely be making these going forward and may even carry them in my Etsy shop!
ReplyDeleteI just made 2 of these for friends of mine that are sisters and due within a month of each other. I cannot believe how easy they were and how quick they went together! I will definitely be making more and may even start carrying them in my etsy shop!
ReplyDeleteMade a sleep sack and modified it to how I wanted it to be. Thankful for this tutorial because I wasn't sure where to start!
ReplyDeleteThanks for the tutorial! I used this to make my own modifications and I'm really excited how it turned out! I'm a beginner (only been sewing couple months), but I love it and have so much fun!!!
ReplyDeleteWonderful! I'm so glad you found the tutorial useful! :)
DeleteI posted a pic on my blog also.
DeleteAdorable! Do you ever have problems getting them on since there's no stretch where the fabric attatches?
ReplyDeleteYou can definitely run into issues, but there are a couple of ways around it. When I sew the ribbon to the gown, I lightly stretch it a bit so the onesie part is a little roomier. It's usually enough to not be a concern. Another option is to leave off the ribbon or use an elastic ribbon. Blanks Boutique makes onesies that button down the back so you could make it with one of those too and then it wouldn't need to stretch as much going over the baby, but that seems like a lot of work going around the opening in the back. lol
DeleteAwesome! Do you have any problems with getting the gown on since there's no stretch where they attatch?
ReplyDeleteBeautiful!!!
ReplyDeleteDo you have a video to watch on how to make these dresses?
ReplyDeleteI sure don't. I'm camera shy. :)
DeleteThis is great, I have been looking for a good easy step by step for making this for a preemie and your guide on the measurements was great. Thanks for sharing
ReplyDeleteI love this little gown. It is so cute! I am trying to print out the tutorial for my notebook. I like to have an actual print out of my patterns. Is the tutorial not printable? I'm not able to print it. Thank you.
ReplyDeleteThis comment has been removed by the author.
Deletei love your tutorial my daughter is having a girl in oct and she wants one so i would love a copy of the pattern also so i can have it handy when i sew thanks i will email you my address
ReplyDeleteI ABSOLUTELY LOVE THESE!My cousin is having a baby girl and i can't wait to make one of these for her shower. Thank you ever so much for sharing! These are the cutest things I've seen in a long time :) i love the baby gowns and these prettied up versions are awesome!
ReplyDeleteThis is soooooo perfect! I cannot wait to try! I am having a baby girl in November as well as several friends! :-) I can't wait to make several of these for our lil' babes! I've only been sewing a few months...Hope I can handle this! :-)
ReplyDeleteCould you use elastic at the top of the gown before you sew it to the bodice?
ReplyDeleteAbsolutely! I know several people have made them that way.
DeleteI love this tutorial and it is so very nice of you to do this.
ReplyDeleteI am wondering what embroidery machine you have and if you use any special cartridges for it. I dont know where to begin as far as which would be a good model for this kind of monogramming They all seem expensive so I want to get the right thing.
Hi Caz! I have a Happy Voyager 12 needle embroidery machine. (In the photos, I used a ULT 2003D single needle.) I don't use any special cartridges; I just purchase single designs from the internet and transfer them to the machine. A good starter model would be a Brother PE770 or PE780D. Both of those are reasonably priced and would be great for monogramming or 5x7 and smaller designs.
DeleteThank you for this tutorial!! I can't wait to try this!!
ReplyDeleteThank you for this tutorial!! I can't wait to try this out!! Fantastic work!!
ReplyDeleteThank you so much for sharing. I love the little gowns......they are amazing.
ReplyDeleteYou're welcome!
DeleteThank you so much for this. A friend sent me your link and asked me to make it for her. Very excited to get started. Love your layette!
ReplyDeleteLOVE LOVE LOVE!!! I've been trying to find this tutorial everywhere Thank you so much for sharing!!!!
ReplyDeleteLOVE LOVE LOVE!!! I have been looking everywhere for this tutorial. Thank you for sharing!!!!
ReplyDeleteI just tried to send you an email to the email shown here and got an undeliverable. Do you have a email to inquire about the license?
ReplyDeleteHi Evie! Please feel free to use this tutorial for gowns that you sell. I ask that in your description somewhere you note that the tutorial/pattern is from Banana Bear Boutique. :)
DeleteWonderful! Will do :) Thanks so much
DeleteLove it about to give it a try!
ReplyDeleteThank you so much for taking the time to share such a great tutorial!
ReplyDeleteThanks. This is the easiest version I can find.
ReplyDeleteThese are just so adorable!!! I found the cutest onesie at Kohls with a snowman's face embroidered on it and just made it. Turned out SOOOO cute. I used elastic thread in the bobbin which gave it a little bit of stretch.
ReplyDeleteLove love this! Two questions...can the hem be sewn when you are working on the skirt while still flat (after sewing the side seam)? What types of fabrics work best? Can't wait to make this...expecting my little girl in February!
ReplyDeleteMy friend has asked me to make one of these for her baby....She wants the overall length of the dress to be 28 so should I but my fabric 25 X 36...26 being that there will be about 4" of onesie and then for hem allowance and such
ReplyDeleteThese are so cute!! Thanks for sharing!! I have an upcoming baby shower that I think I will make one of these for :)
ReplyDeleteI can't wait to make these for friend's baby showers!! thank you
ReplyDeleteI just found this tutorial - I hope to use for a baby gift- Thanks the posting this.
ReplyDeleteYour set is beautiful.
Thank You sew much for sharing this tutorial--plan on making it very soon! THX
ReplyDeleteHi! I want to make one of these for my baby due in April. Have you tried it using Minky for the gown? On etsy they sell for $40 and that's too much for me but I haven't sewn with Minky before so I don't know how hard that would be. Thanks for any help you could give
ReplyDeleteBeautiful!
ReplyDeleteSo cute! Going to make some soon!
ReplyDeleteThank you so very much for you tutorial on how to make these adorable gowns. I can't wait to try and make one for my niece.
ReplyDelete
ReplyDeleteAlready monogrammed one for my friend at work and have everything cut, thank you SO much for the tute, she's going to love it!
Thank you so much. I am adding it to my to do list:)
ReplyDeleteThank you for your tutorial! I made some very cute sleep sacques for my granddaughter who is about to make us great-grandparents! I made matching headbands also. I didn't like wasting the bottom part of the Onsies since I got some cute ones with polkadots and flowers, so I made a casing for elastic at the top of them and now they are cute diaper covers. :-) Mommy may not want to use them with the sleep sacques, but they will be cute under little dresses.
ReplyDeleteSo, my sister is expecting her 3rd child and found a picture of these onsie gowns on line. She is not at all crafty but we both felt the new baby needed one of these in her closet! Since I sew, I did a google search and found your site. I never sew w/out a pattern but your directions and pictures made it really easy for me to follow. I made a sample that came out really cute! Thanks for sharing your ideas! It's amazing how simple, inexpensive and fun this could be! I can't wait to see my little niece in her new outfit!
ReplyDeleteThank you very much for this post!! I am always looking for new ideas and I have several costumers that send me requests. Having good, easily understandable instructions are invaluable. Thanks again!!
ReplyDeletethanks for the tutorial, mine turned out so cute. My daughter wanted one for her new baby, but did not have time to make her one, so I will surprise her when she comes. I appreciate your sharing your knowledge so I didn't have to guess. :)
ReplyDeletethanks for the post, my daughter wanted one for her baby due in a week, but decided she did not have time to make one, so I will surprise her. I appreciate your sharing your knowledge, so I don't have to guess and have possible "trial" gown, that didn't work out! :)
ReplyDeleteGreat tutorial. I have questions on sewing the ribbon. Do you line up the edge of the ribbon with the seam and do you sew only the top edge of it? Thank you for sharing this tutorial. Liz
ReplyDeleteThank you so much! I wish I could post a picture I am so excited about how well this turned out! FYI I used that stretchy crochet headband material in place of the ribbon around the bodice to help it not "constrict". Worked like a charm! Plus as an added bonus I was able to make a matching headband and flower.
ReplyDeleteThank you so much! I wish I could post a picture I am so excited about how well this turned out! FYI I used that stretchy crochet headband material in place of the ribbon around the bodice to help it not "constrict". Worked like a charm! Plus as an added bonus I was able to make a matching headband and flower.
ReplyDeleteThis was literally my first sewing project and it turned out so cute! I have 26 days until my second precious daughter is born and I am so proud that she will have this to wear and I made it :) Thank you!!!!
ReplyDeleteThank you, thank you, thanks you!!!!!!
ReplyDeleteThanks for this great tutorial. I have made 10 of these gowns and matching burp cloths.
ReplyDeleteI love this tutorial! I just made one for a friends baby shower and it is adorable. Thanks for sharing!
ReplyDeleteI loved this tutorial! It was easy to follow and well written. Thanks for sharing!
ReplyDeleteI love these! I am expecting my first granddaughter in September and am so excited to make some of these for her! Thank you so much for sharing!
ReplyDeleteThank you! your directions were easy to follow and I looked up a few manuvers that I have never done before and I've made 2 so far in 2 hours! I love them! I have a little girl due in october and many sewing projects before then. One question.... what do you do with the inside fabric from sewing teh onesie and bottom together? wouldnt it bother the baby?
ReplyDeleteI wondered about that too.
DeleteDo you have to have buttonholes? What are they for?
ReplyDeleteMaking this for my niece due at the end of August. I'm so glad I found this tutorial and plan on using it for all the new baby girls in our family and friend group :)
ReplyDeleteWonderful tutorial!!
Thanks for the tutorial! Can't wait to give it a try!
ReplyDeleteThank you for this wonderful tutorial! I'm new at sewing but will definitely give this beautiful project a try!!
ReplyDeleteThank you for this wonderful tutorial!!! I am new at sewing, but will definitely give this beautiful project a try!!!!
ReplyDeleteLove it! I'm going to try one right now!!
ReplyDeleteHi, SOOOO cute! I'm going to try one soon! Thank you for sharing your tutorial!
ReplyDelete